
一、前言
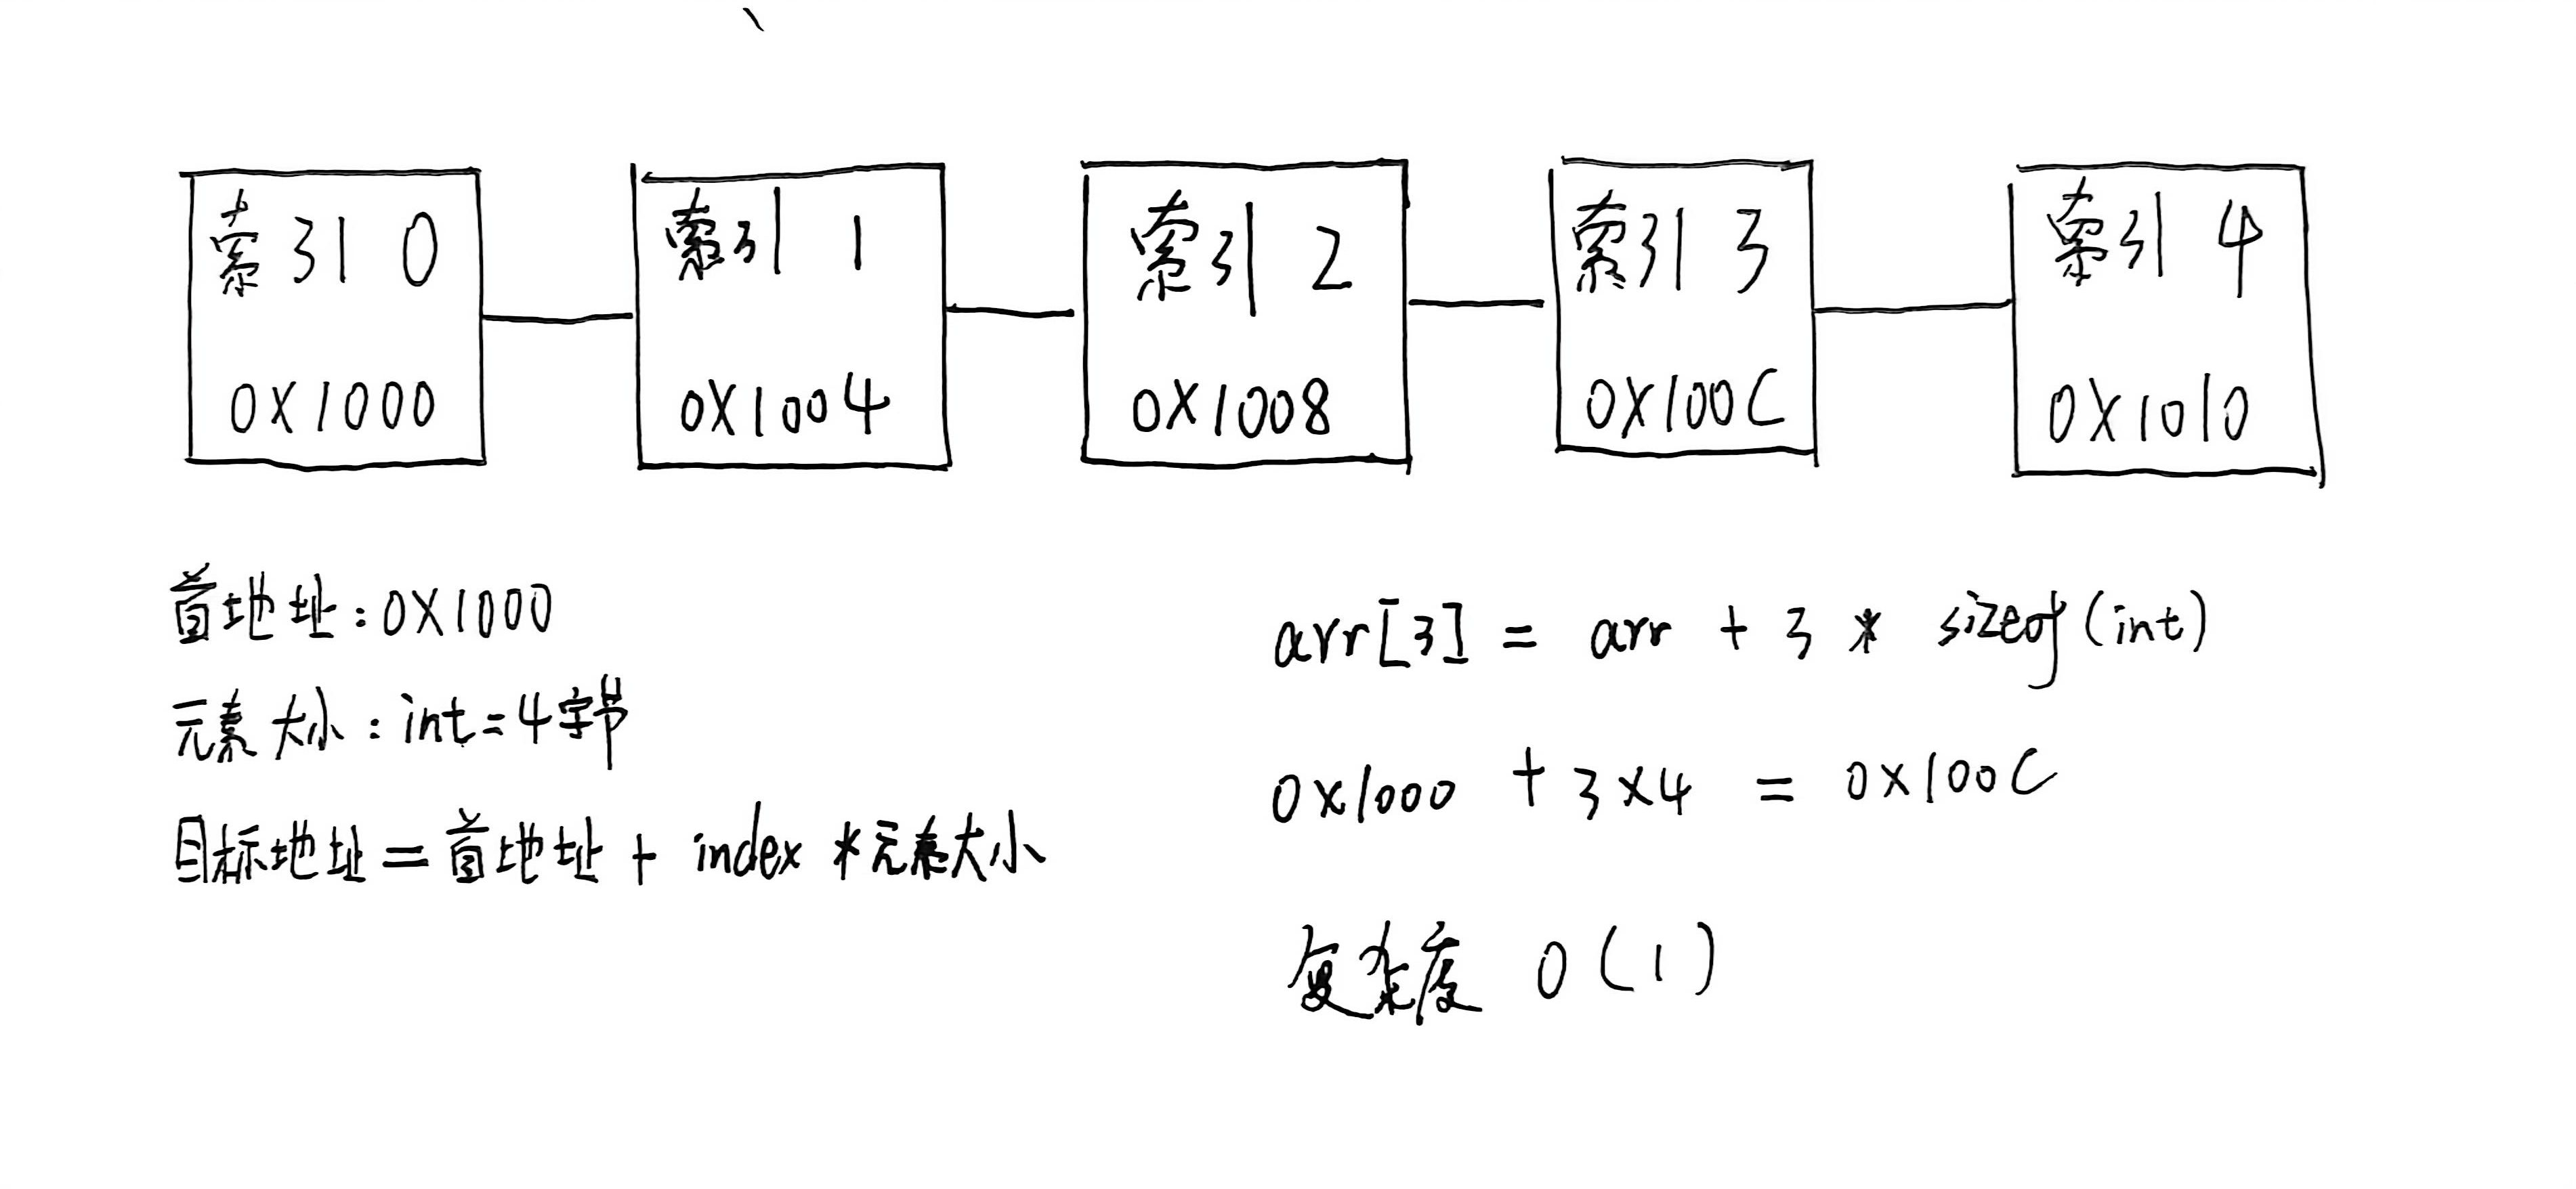
数组是一段连续的内存空间,数组名是数组的首地址,知道索引后可以通过地址计算公式来计算出元素的地址,从而实现 O(1) 的访问时间。
但是这种方式也有很大的缺点,当数据稍微大时,你就不可能记得住每个元素的索引位置。
比如说:
string names1[] = {"小王", "小李", "小张"};

string names2[] = {"小王", "小李", "小张", "小赵", "小刘", "小陈", "小杨", "小吴", "小郑", "小冯"};
这个时候用非负整数作为索引就不太合适了,我们更希望用一个更方便好记有意义的数据来作为索引,比如说名字(字符串)或者学号(数字)等。
哈希表可以满足这个需求,它能在 O(1) 的时间复杂度内实现通过键(key)来访问值(value)。key 可以是任何类型的数据,比如字符串、数字等,而 value 则是与 key 相关联的数据。
二、哈希表的原理
哈希表的底层实现通常是一个数组,还记得数组是怎么访问的吗?
数组通过地址计算公式来找到目标元素的地址后进行访问,一步计算,所以访问时间复杂度是 O(1)。
数组的地址计算公式是:元素地址 = 数组首地址 + (索引 * 元素大小)
那只要我们能设计出一个函数,能将任意类型的 key 转换成数组里面的索引,就又和访问数组一样了。
1、哈希函数
哈希函数(Hash Function)就是用来将任意类型的 key 转换成数组索引的函数。
也不用你自己想怎么把 key 转换成整数了,因为已经有了很多种成熟的哈希函数可以直接使用,比如说除留余数法。
除留余数法的原理是:hash(key) = key % table_size,其中 table_size 是哈希表的大小,key 是要存储的键。
那问题又来了,key 是任意类型的,只有数字才能进行取模运算,那字符串怎么办呢?
可以通过将字符串转换为整数来解决这个问题。常见的方法是将字符串的每个字符的 ASCII 码相加。
比如说现在要存放 5 个学生的成绩,那么哈希表大小为 5,姓名作为 key,成绩作为 value。
| 姓名(字符串) | 转换为整数(ASCII 码之和) | 哈希函数计算结果(取模计算) |
|---|---|---|
| Alice | 65 + 108 + 105 + 99 + 101 = 478 | 478 % 5 = 3 |
| Bob | 66 + 111 + 98 = 275 | 275 % 5 = 0 |
| Charlie | 67 + 104 + 97 + 114 + 108 + 105 + 101 = 696 | 696 % 5 = 1 |
| David | 68 + 97 + 118 + 105 + 100 = 488 | 488 % 5 = 3 |
| Eve | 69 + 118 + 101 = 288 | 288 % 5 = 3 |
这时候你会发现有三个学生的哈希函数计算结果都是 3,但是在数组中索引 3 只能存放一个元素,这就产生了哈希冲突。
2、哈希冲突
哈希冲突是指不同的 key 经过哈希函数计算后得到相同的索引位置。
哈希冲突是哈希表中不可避免的问题,我们可以通过一些方法来解决哈希冲突,根据经验:
除留余数法的除数通常建议选用接近哈希表大小的质数作为除数,这样可以减少哈希冲突的概率。
刚才的大小是 5,这里再选 5 的最近质数 3 和 7,现在再次计算哈希函数:
| 姓名(字符串) | hash % 5(原) | hash % 3 | hash % 7 |
|---|---|---|---|
| Alice | 478 % 5 = 3 | 478 % 3 = 1 | 478 % 7 = 2 |
| Bob | 275 % 5 = 0 | 275 % 3 = 2 | 275 % 7 = 2 |
| Charlie | 696 % 5 = 1 | 696 % 3 = 0 | 696 % 7 = 3 |
| David | 488 % 5 = 3 | 488 % 3 = 2 | 488 % 7 = 5 |
| Eve | 288 % 5 = 3 | 288 % 3 = 0 | 288 % 7 = 1 |
通过取模 7 哈希函数计算结果分别是 2、2、3、5、1,虽然还是有冲突,但分布更均匀
那么为了解决哈希冲突,我们可以使用更靠谱的方法:链地址法和开放地址法。
3、链地址法
还是拿上面的例子来说,哈希函数取模 3 计算结果分别是 1、2、0、2、0,索引 0 和索引 2 都有冲突。
那干脆直接在数组的每个索引位置上都放一个链表,链表里面存储所有哈希函数计算结果相同的元素。
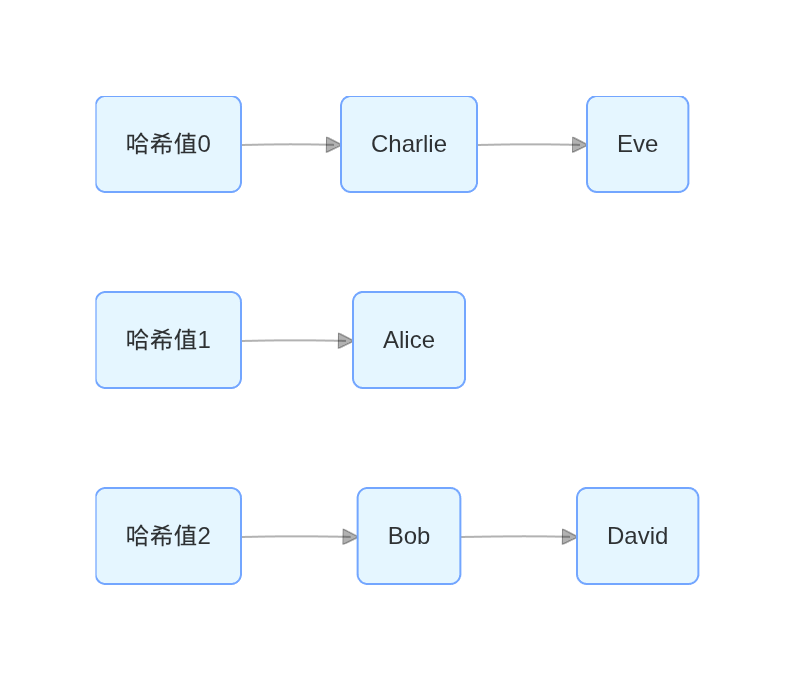
以上图中,索引 0 的链表存储了 Charlie 和 Eve,索引 1 的链表存储了 Alice,索引 2 的链表存储了 Bob 和 David。
这种方法名叫链地址法也叫拉链法,优点是实现简单,缺点是当哈希冲突较多时,链表的长度会变长,访问效率会降低。
4、开放地址法
开放地址法的原理是当发生哈希冲突时,继续向后寻找下一个空闲的索引位置来存储元素。
比如说现在哈希函数计算结果分别是 1、2、0、2、0,索引 0 和索引 2 都有冲突。但是索引 3、4 都是空闲的。
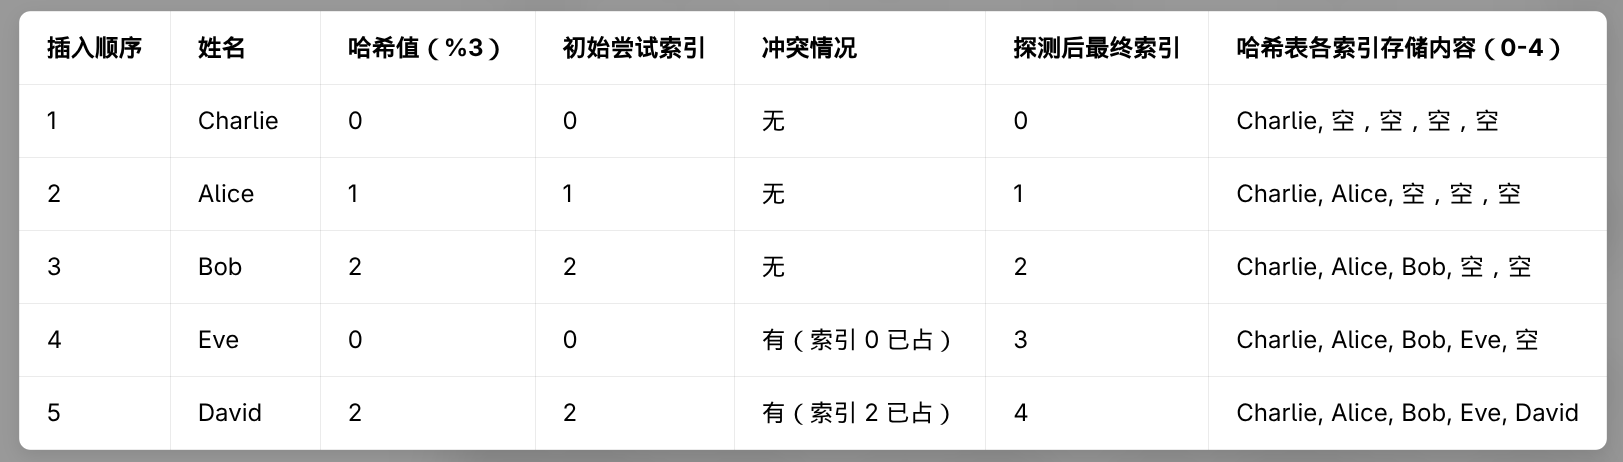
这种方法通过向后寻找空闲位置来解决哈希冲突,名叫开放地址法,而开放的类型又分为线性探测、二次探测和双重哈希等不同的策略。
优点是节省了链表的空间,缺点是当哈希冲突较多时,寻找空闲位置的时间会增加,访问效率会降低。
5、扩容
当然,为了避免多个 key 被分到同一个索引位置,我们可以通过扩容来增加哈希表的大小,从而减少哈希冲突的概率。
一般来说,当哈希表中的元素数量达到哈希表大小的 70% (负载因子为 0.7)时,就可以进行扩容了。
例如在 Java 中,当负载因子超过 0.75 时,系统会将哈希表扩容至原先的 2 倍。
还是拿那 5 个人来说,原表大小为质数 7。现在扩容到下一个质数 11:
| 姓名(字符串) | 转换为整数(ASCII 码之和) | 原表 7 | 新表 11 |
|---|---|---|---|
| Alice | 65 + 108 + 105 + 99 + 101 = 478 | 2 | 5 |
| Bob | 66 + 111 + 98 = 275 | 2 | 10 |
| Charlie | 67 + 104 + 97 + 114 + 108 + 105 + 101 = 696 | 3 | 3 |
| David | 68 + 97 + 118 + 105 + 100 = 488 | 5 | 4 |
| Eve | 69 + 118 + 101 = 288 | 1 | 2 |
扩容后哈希函数计算结果分别是 5、10、3、4、2,完全没有冲突了!
三、哈希表的简单实现
1、拉链法
#include <iostream>
#include <list>
#include <string>
#include <vector>

using namespace std;

class HashTable {
private:
    int tableSize_;
    vector<list<pair<string, int> > > table_; // 键值对链表数组

    // 哈希函数,将字符串转换为整数
    int hashFunction(const string &key) {
        int hashValue = 0;
        for (char ch: key) {
            hashValue += ch;
        }
        return hashValue % tableSize_;
    }

public:
    HashTable(int size) : tableSize_(size), table_(size) {
    }

    // 插入元素

    /*
    1、首先通过哈希函数计算出 key 对应的索引位置 index。
    2、然后 for 循环遍历该索引位置的那条链表,看看是否已经存在相同的 key。
    3、如果存在相同的 key,则修改对应的 value。
    4、如果不存在相同的 key,则将新的键值对插入到链表的末尾。
    */

    void insert(const string &key, int value) {
        int index = hashFunction(key);
        for (auto &pair: table_[index]) {
            if (pair.first == key) {
                pair.second = value;
                return;
            }
        }
        table_[index].emplace_back(key, value);
    }

    // 查找元素
    int find(const string &key) {
        int index = hashFunction(key);
        for (const auto &pair: table_[index]) {
            if (pair.first == key) {
                return pair.second;
            }
        }
        throw runtime_error("Key not found");
    }

    // 删除元素
    void remove(const string &key) {
        int index = hashFunction(key);
        table_[index].remove_if([&key](const pair<string, int> &pair) {
            return pair.first == key;
        });
    }
};

int main() {
    HashTable hashTable(5);
    hashTable.insert("Alice", 90);
    hashTable.insert("Bob", 85);
    hashTable.insert("Charlie", 92);
    hashTable.insert("David", 88);
    hashTable.insert("Eve", 95);

    cout << "Alice's score: " << hashTable.find("Alice") << endl;
    cout << "Bob's score: " << hashTable.find("Bob") << endl;
    cout << "Charlie's score: " << hashTable.find("Charlie") << endl;
    cout << "David's score: " << hashTable.find("David") << endl;
    cout << "Eve's score: " << hashTable.find("Eve") << endl;

    hashTable.remove("Bob");
    try {
        cout << "Bob's score: " << hashTable.find("Bob") << endl;
    } catch (const runtime_error &e) {
        cout << e.what() << endl;
    }

    return 0;
}
2、开放地址法
#include <iostream>
#include <string>
#include <vector>

using namespace std;

class HashTable {
private:
    int tableSize_;
    vector<pair<string, int> > table_; // 键值对数组
    vector<bool> occupied_; // 标记数组,表示索引位置是否被占用

    // 哈希函数,将字符串转换为整数
    int hashFunction(const string &key) {
        int hashValue = 0;
        for (char ch: key) {
            hashValue += ch;
        }
        return hashValue % tableSize_;
    }

public:
    HashTable(int size) : tableSize_(size), table_(size), occupied_(size, false) {
    }

    // 插入元素

    /*
    1、首先通过哈希函数计算出 key 对应的索引位置 index。
    2、然后 while 循环检查该索引位置是否被占用。
    3、第一次循环时,如果索引位置没有被占用,则直接将键值对插入到该位置,并标记为占用。
    4、如果索引位置已经被占用,则检查该位置的 key 是否与要插入的 key 相同。
    5、如果相同,则修改对应的 value,并返回。
    6、如果不同,则继续向后寻找下一个索引位置,直到找到一个空闲的位置或者找到相同的 key。
    */

    void insert(const string &key, int value) {
        int index = hashFunction(key);
        // 冲突则向后找空闲位置
        while (occupied_[index]) {
            if (table_[index].first == key) {
                table_[index].second = value; // 覆盖已有key
                return;
            }
            index = (index + 1) % tableSize_; // 循环探测
        }
        table_[index] = make_pair(key, value);
        occupied_[index] = true;
    }

    // 查找元素
    int find(const string &key) {
        int index = hashFunction(key);
        while (occupied_[index]) {
            if (table_[index].first == key) {
                return table_[index].second;
            }
            index = (index + 1) % tableSize_;
        }
        throw runtime_error("Key not found");
    }

    // 删除元素(此处为简化实现,实际生产环境需要使用懒删除或重新哈希策略)
    void remove(const string &key) {
        int index = hashFunction(key);
        while (occupied_[index]) {
            if (table_[index].first == key) {
                occupied_[index] = false; // 标记为未占用(会存在假删除问题)
                return;
            }
            index = (index + 1) % tableSize_;
        }
    }
};

int main() {
    HashTable hashTable(5);
    hashTable.insert("Alice", 90);
    hashTable.insert("Bob", 85);
    hashTable.insert("Charlie", 92);
    hashTable.insert("David", 88);
    hashTable.insert("Eve", 95);

    cout << "Alice's score: " << hashTable.find("Alice") << endl;
    cout << "Bob's score: " << hashTable.find("Bob") << endl;
    cout << "Charlie's score: " << hashTable.find("Charlie") << endl;
    cout << "David's score: " << hashTable.find("David") << endl;
    cout << "Eve's score: " << hashTable.find("Eve") << endl;

    hashTable.remove("Bob");
    try {
        cout << "Bob's score: " << hashTable.find("Bob") << endl;
    } catch (const runtime_error &e) {
        cout << e.what() << endl;
    }

    return 0;
}
四、STL 中的 unordered_map
C++ STL 中的 unordered_map 就是哈希表的一个实现,它使用了链地址法来解决哈希冲突。
1、实例
#include <iostream>
#include <unordered_map>

int main() {
    // 创建一个 unordered_map,键为 int,值为 string
    std::unordered_map<int, std::string> myMap;

    // 插入一些键值对
    myMap[1] = "one";
    myMap[2] = "two";
    myMap[3] = "three";

    // 打印所有元素
    for (const auto& pair : myMap) {
        std::cout << "Key: " << pair.first << ", Value: " << pair.second << std::endl;
    }

    // 访问特定键的值
    std::cout << "Value for key 2: " << myMap[2] << std::endl;

    // 删除键为1的元素
    myMap.erase(1);

    // 再次打印所有元素
    std::cout << "After erasing key 1:" << std::endl;
    for (const auto& pair : myMap) {
        std::cout << "Key: " << pair.first << ", Value: " << pair.second << std::endl;
    }

    return 0;
}
输出结果:
Key: 1, Value: one
Key: 2, Value: two
Key: 3, Value: three
Value for key 2: two
After erasing key 1:
Key: 2, Value: two
Key: 3, Value: three
2、性能分析
链地址法的性能分析:
- 添加元素:计算哈希值找到对应桶,将元素添加至链表尾部,平均时间复杂度 O(1)。
- 查找元素:计算哈希值找到对应桶,然后遍历该桶中的链表查找,平均时间复杂度 O(1)(最坏 O(n),当所有键都冲突时)。
- 删除元素:计算哈希值找到对应桶,遍历链表找到元素后删除,平均时间复杂度 O(1)(最坏 O(n))。
| 操作 | 数组 | 链表 | 哈希表(链地址法) |
|---|---|---|---|
| 添加元素 | O(1) | O(1) | O(1) 平均 / O(n) 最坏 |
| 查找元素 | O(1)* | O(n) | O(1) 平均 / O(n) 最坏 |
| 删除元素 | O(1)* | O(n) | O(1) 平均 / O(n) 最坏 |
* 数组通过索引访问为 O(1),按值查找为 O(n)